

Instruction Manual
Welcome to the more in-depth instructions for The Putting Cheat Code. You would have found this page by scanning the QR code on the basic instructions enclosed in your bag and so by now you would have a good idea as to how the 3 items below will help to transform your putting
The Distance Control Mat
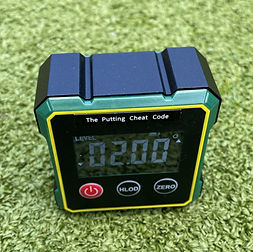
The Validator (Box Level)
The Ball Marker
There is NO secret to holing more putts and all the best coaches on the internet will tell you that you need 3 main things to achieve that. You need to aim at your target, read the slope on the green correctly and hit the ball with the correct pace. The Putting Cheat Code will give you all 3 of those things by following the simple process.
The first thing to say is this is a Training Aid which should be used on the putting green, however you are encouraged to use the Validator and the Ball Marker on the golf course as much as possible. The Ball Marker is legal as per the Rules of Golf *, however using the validator in competitions would be CHEATING, however any other round of golf you should use it and even encourage your playing partners to use it. The idea is to build as much data into your mind about how you read the green and validate it to help you understand how accurate you are at seeing/feeling the slopes on the green. In scientific studies it has been found that 60% of putts that are missed are due to mis reading the green.
Before you carry on, lets just cover off some possible negative reaction to the Validator and how it maybe perceived to give you an unfair advantage. The use of Distance Measuring Devices were made legal to use on the golf course in 2006 (GPS Watches) The Range Finder became legal in 2019 and so golfers that used them were able to know the exact distance to the hole. Strangely, this did not mean that every golfer started to hit their shots to 2 feet every time, and the Validator is no different. Just because you will have an idea of the slope on the green it will not guarantee that you will hole every putt.
However put the 3 items from The Putting Cheat Code together and you will definitely start to hole more putts.
* Players Equipment, Rule 4.3a, Equipment Standards, Devices and Other Equipment Section 6.7.
The Putting Cheat Code Process
One further point before you get into the detail of using the different parts of the Putting Cheat Code. You need to be aware that within the rules of golf you are allowed 40 seconds to complete all aspects of your putting process.
This includes reading the green, lining your ball up and hitting the putt. Because this is a Training Aid predominatley it will not really effect you, however when you are using it on the course with your mates the process you should use to keep play moving on is
Mark your ball and line the Centre line of the Ball Marker up with the hole.
Read the green and pick your line. Do this while you are waiting for your playing partners if possible.
When you are ready to putt, starting from the ball, pace out your putt. ( e.g. 5 paces is 15' )
Walk backwards from the hole placing your Validator on the ground 2 or 3 times depending on the length of putt on the line you have read.
Depending on the break you have read place the ball correctly on the Marker.
Take your putt.
This should keep you inside the rules. More detailed information about using the Putting Cheat Code is below.
The Distance Control Mat
The Distance Control Mat is a fundamental part of the Putting Cheat Code. Studies show that 75% of Putts on the golf course are hit from 18 feet and in. When you look further into the stats golfers leave a 15 foot putt over 3 feet short of the hole more times than they hole it. The main cause of this is deacceleration of the putter which happens more than you think. The key to good Distance control is good tempo the Cheat Code Mat will help you with that.
Mat Set Up

Pace Control Mat showing set up.
Place the Mat on a flat piece of Green which enables you to hit a putt of 18 feet and secure the mat with golf tees.
Starting from the centre line of the mat (Inline with the half golf ball) pace out 6' 9' 12' 15' and 18' and place a tee in the ground at each position. The distances have been chosen as generally a persons stride is 3 feet and so there is no need to measure the distances with a measuring device.
Place a golf ball on the green in line with the half golf ball allowing enough space for the putter head to travel freely without hitting the mat. (You can putt from either side of the mat depending on what is more comfortable for you).
To start try a 15 foot putt. To do this place a tee into the green inline with the green 15' line. One for the back stroke and one for the forward stroke. The tees need to be positioned so that the putter head doesn't hit them whilst making the stroke ( As per the picture )
Making the Stroke

Back Stroke to 15' Green Line

Forward Stroke to 15' Green Line.
Address the ball, ideally the ball will be very slightly ahead of the centre of your stance to allow for a slight upward stroke of the ball. Consistent ball position is vitally important if you want consistent pace. Use the mat as a gauge by picking out a part of your clothing, belt buckle for example to ensure the ball position is the same for every putt.
Make the stroke by taking the putter back inline with the 15' Green line / Tee in the ground and then forward to the other 15' Green line / Tee in the ground. Ensure you accelerate the putter through to the forward line / Tee. Any deacceleration will result in the ball coming up short of the distance you were aiming for.
Tempo is key. Try counting 1, 2 to yourself as you make the putt. 1 on the back stroke and 2 for the forward stroke . It may take a few goes to get this correct however it is key to you controlling the pace and distance of your putt. Once you get the tempo correct the putt will travel 15 feet. Complete the same process for all the other distances. Remember TEMPO is key.
For information the Distance Control Mat has been set for different green speeds. The Green line is for a green 10 on the stimp metre, the Amber line is for 9 on the stimp metre and the red is for 8 on the stimp metre.
Once you have got the Tempo of your stroke correct you will be able to access the speed of the green you are playing on at any time. For this purpose set up a 12' foot putt on a flat piece of green before your round and hit 5 putts one after the other using the green line as your back and forward swing. Pace out the average distance to see how far they have gone. You will now have an idea of how fast the green is rolling ready for your round and you can adjust the length of your stroke accordingly.
The Putting Mat Cheat

The Distance Control Mat showing the Cheat to help determine length of stroke for each distance
To help you to consistently hit your putts the correct distance on the putting green when you don't have the mat, use this CHEAT. When you are practicing make a mental note of where your feet are positioned in relation to the different lines on the mat. For example the back stroke for a 12' putt is opposite your right foot big toe and the forward swing stops at your left foot 3rd toe. The more you practice with the mat the more natural it will become. For information you are not allowed to make a mark on your golf shoe to give you a guide as to how far to take the putter back. That is against the rules of golf.
Reading The Green
Every scientific study concludes that amateur golfers don't allow enough break for the majority of putts and the more break the putt has the more the read tends to be wrong. Even when the putt has been read correctly the subconscious mind has this knack of telling you that you are aiming in the wrong direction and you will either push / pull the ball off line. Does that ring a bell?
Golfers have a number of different ways of reading the green. The Putting Cheat Code will not change the way you actually read the green. If you read by sight from behind the ball, or measure the slope using your feet that is great and you should carry on.
The only thing you need to be aware of is the Cheat Code works using the degree of slope you are putting on. if you read the green by feel through your feet you will have to align that feel to a degree of slope between 1 and 4. Remember the Cheat Code is degrees of slope not percentage.
If you measure through sight you will have to relate what you see to a degree. For example.
A slight slope would covert to a 1 degree read.
A mild slope would convert to a 2 degree read.
A moderate slope would convert to a 3 degree read.
A steep slope would convert to a 4 degree read.
One further thing the Cheat Code needs is a your estimation of what the slope is at either 2 or 3 locations along the line of the putt. For putts less than 12 feet , 2 locations and 3 for anything over that. For example, you have a 15' putt that starts at 3 degrees, continues at that level through the second part of the putt and it reduces down to 1 degree in the last 3 feet of the putt. This is key to getting the best out of the Cheat Code and is a fundamental reason why greens are misread.
The more you practice by reading the green and checking with the validator the better you will become at seeing slopes and what they convert to.
Using The Validator
The validator is exactly what it says it is. It is to check your READ, not to use instead of reading the green. This piece of equipment is illegal as per the rules of golf and will not be allowed to be used in competitions and so will not help you to improve unless you are reading the green first . The instructions for the operation of the validator were included in the Putting Cheat Code bag. It is as simple as turn it on and ensure the reading is set to read the slope in degrees.
Reading The Validator
The Validator showing a Right to Left Breaking Putt

The Validator showing a Left to Right Breaking Putt
Reading the Validator to determine which way your putt is breaking is straight forward. Above you will see 2 pictures showing different breaks. As you can see there are 2 arrows on the screen. 1 on either side of the screen. The screen that has the downward arrow in the left corner is showing a left to right breaking putt and the screen with the downward arrow on the right side is showing a right to left breaking putt. Test it out on the greens and you will soon get the hang of it.
Checking Your Read


When you have made your read by sight or by feel and converted it to a degree reading between 1 and 4 you need to place the validator along the line of the read you have chosen.
Depending on the length of the putt you should place in 2 or 3 positions on your chosen line. For putts up to 12' you should take 2 readings, above that it should be 3.
Take your reads walking backwards from the hole to the ball position.
Compare the reads to what you have seen or felt. If they are almost the same, that's great you are seeing/feeling the slopes, If not this should start to build a picture in your mind what you are seeing/feeling against what the slope actually is. The more you do it the better you will get.
Checking whether the putt is up hill or down hill is another key factor. When you walk onto some greens it is fairly obvious which way the ground is sloping, however sometimes slopes around the green could give you an optical illusion where slope looks like it is down hill, however it is fairly flat around your putt. This is key to helping you hit the correct length of putt
To convert your reads to a degree for the line you have to hit the putt on you need to take the reads you have taken on the validator. For example you have a 15' putt. 3' from the hole the read is 1.2 degrees sloping left to right, your second read is 2.4 degrees also sloping left to right and your 3rd read close to your ball is 2.3 degrees also sloping left to right. The putt is also slightly up hill reading 0.8 degrees. With this information you can now determine that the line you should be hitting your putt on would be a 2 degree left to right putt.
The more you take the reads and work out what you believe the break will be the better you will get at it, however the general rule will be if you have more break at the start of the putt and less at the end you would reduce the amount of break you are giving the putt as the ball is travelling faster at the start of the putt and doesn't take as much break and visa versa if there is more break at the end of the putt you would give more break on the putt as the ball breaks more as it slows down.
There will be times when you are looking at a putt that looks straight. As you will probably have discovered in the past, you think you have hit a great putt only for it to miss due to a break you have not seen/felt in the last couple of feet. For all putts that you believe are straight place the validator inline with the hole a foot away to see the read. It may be straight, or there may be a slope you have not seen/felt, however this will help you to see the subtle breaks around the hole for future reference.
The Validator is to help you build pictures in your head to enable you see breaks that you may be missing. It is not to replace the need for you to read the green. It is illegal in competitions.
Using The Ball Marker
The Ball Marker is the final part of the Putting Cheat Code, and is legal within the rules of golf. If you want to check you can find the information under Players Equipment, Rule 4.3a, Equipment Standards, Devices and Other Equipment Section 6.7. The Marker does not break any of the rules and so is legal to use.
Aligning The Ball Marker To The Hole

To use the Ball Marker correctly you will need to have a line drawn on the golf ball or have a brand of ball that has printed the line on already.
Mark the ball as usual using the Ball Marker, however ensure that the manufactured line or one you have drawn on the golf ball continues along the black central line. Before you pick the ball up you will need to ensure that you have lined the Black central line up with the centre of the Hole. See below some examples of how to ensure the ball and Marker are aligned correctly
When you are happy you have marked the ball correctly you should pace out the length of putt you have. Cleary anything inside 18 feet you will have an advantage thanks to the Distance Control Mat, however your sub-conscious will be helped by knowing how far the longer putts are and you will be surprised how your longer putts will become better knowing how far they are.


Aiming The Ball On The Correct Line

Ball set up for a 2 degree Left to Right Breaking Putt.

Ball set up for a 3 degree Right to Left Breaking Putt.
To aim the ball on the read you have chosen you simply replace the golf ball when it is your turn to putt so that the manufacturers line or your drawn on one is in line with the corresponding line for your read. For example
You have a Left to Right breaking putt at 2 degrees. You place the ball on the right side of the Marker inline with the 2nd line from the centre.
You have a Right to Left breaking putt at 3 degrees. You place the ball on the left side of the Marker inline with the 3rd line from the centre.
When you are set up you are ready to hit the putt. As long as you have accessed the break correctly as was described earlier in the Validator section you MUST trust the line. You may well be standing over the putt thinking that this has far to much break. In the thousands of putts that have been hit testing the Marker, the line has been correct.
Good Luck, As long as you follow The Putting Cheat Code process you are going to be astounded by how good your putting will become.
The Putting Cheat Code really is GAME CHANGING for your Putting
Video of The Putting Cheat Code Process
Copyright (c) 2025 The Putting Cheat Code